
Requesting a Patient Merge in eRAD
Purpose: When duplicate patient records exist in eRAD (multiple MRNs for the same patient), Contact Center team members will submit a Merge Suggestion so the appropriate team can review and complete the merge.
Important: PARs do not complete merges - we submit the request for review.
1. Open the Patient Folder
- Use the search function in eRAD to locate and open the patient folder.
- At this point, it does not matter which duplicate record you open first.

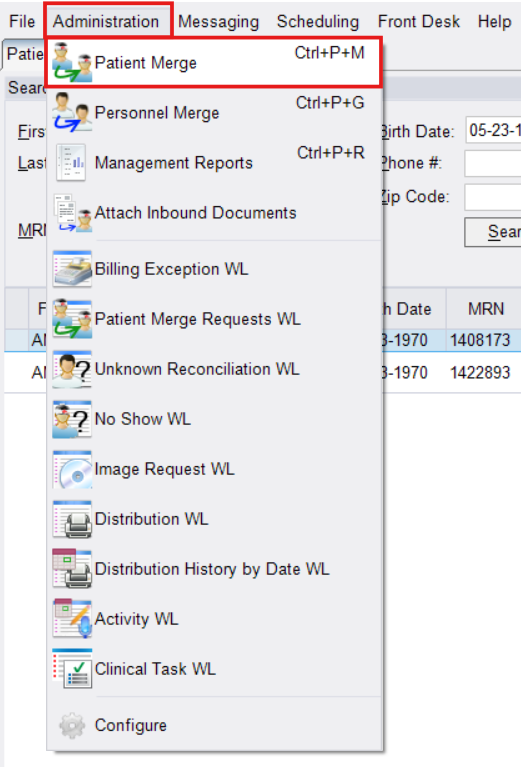
2. Navigate to the Merge Tool
From the eRAD menu:
- Click Administration
- Select Patient Merge

3. Enter Patient Records
The Patient Merge window will open with two sections:
Source Patient Details (Left):
The duplicate MRN that will be discarded
Destination Patient Details (Right):
The MRN that will be kept (primary/active patient record)
Always verify both records belong to the same patient before submitting a request.

4. Search and Confirm
In Destination Patient Details, click Search
- Patient name may auto-populate
- Enter patient's date of birth to narrow results
- Double-click the additional MRN to add it under Destination Patient Details
Verify demographics match (ex: full name, DOB, phone, address) before proceeding.


5. Choose Data to Retain
- If the MRNs are on the wrong sides (Source vs Destination), use the arrows to swap.
- For each field (ex: name, DOB, address), click the radio button next tot he value that should be kept.
Review carefully - these selections determine which data remains after the merge is completed.

6. Submit the Merge Suggestion
A) Click Suggest

B) In the Comment box, enter ONLY the following:
Required: Site location (first)
Optional: Any helpful identity confirmation details such as:
- Prior / maiden name
- Phone number
- Address
- Other demographic details that support validation
Do not include unnecessary or unrelated comments. Extra comments delay review and processing.
Comment Examples (Preferred Format):
- BETHESDA, PRIOR LAST NAME: SMITH
- STERL, PHONE MATCHES: 555-123-4567
- PARK, DUPLICATE MRNS, SAME DOB AND ADDRESS

C) Click OK
This submits the merge suggestion only. The team responsible for validating and completing merges will process it once received.

EDITED: 01/30/2026
